lamp使用https

直接使用yum安装lamp环境

1
2
3
4
5
6
7
8
9
10
11
12
13
14
15
16
17
18
19
20
21
22
23
24
25
26
27
28
29
30
31
32
33
34
35
36
37
38
39
40
41
42
43
44
45
46
47
48
49
50
51
52
53
54
55
56
#安装lamp
[root@www2 ~] yum -y install mariadb-server httpd php php-mysql php-fpm openssl-devel
#安装http支持ssl的模板,安装成功后,会有/etc/httpd/conf.d/ssl.conf 文件
[root@www2 ~] yum install mod_ssl -y
#启动lamp环境相关服务
[root@www2 httpd]# systemctl restart httpd
[root@www2 httpd]# systemctl restart mariadb
[root@www2 httpd]# systemctl restart php-fpm

#设置mysql数据库密码,创建安装discuz和WordPress的数据库
[root@www2 httpd]#mysql
MariaDB [(none)]> set password=password('123qwe'); #设置数据库密码
Query OK, 0 rows affected (0.00 sec)

MariaDB [(none)]> show databases;
+--------------------+
| Database |
+--------------------+
| information_schema |
| mysql |
| performance_schema |
| test |
+--------------------+
4 rows in set (0.01 sec)

MariaDB [(none)]> create database discuz; #创建数据库
Query OK, 1 row affected (0.00 sec)
#授权www可以本地登陆
MariaDB [(none)]> grant all on discuz.* to www@'localhost' identified by '123qwe';
Query OK, 0 rows affected (0.00 sec)
#设置www可以远程登陆数据库
MariaDB [(none)]> grant all on discuz.* to www@'%' identified by '123qwe';
Query OK, 0 rows affected (0.00 sec)

#将生成的签名放入到/etc/httpd/conf.d/下
[root@www2 httpd]# ls conf.d/
autoindex.conf README server.csr ssl.conf welcome.conf
php.conf server.crt server.key userdir.conf server.key.unsecure
#将保护私钥的密码从认证文件里抽离出来,生成server.key.unsecure
[root@www2 ~]# openssl rsa -in server.key -out server.key.unsecure

#修改ssl的配置文件,指明认证文件位置
[root@www2 ~]# vim /etc/httpd/conf.d/ssl.conf
100 SSLCertificateFile /etc/httpd/conf.d/server.crt
101
102 # Server Private Key:
103 # If the key is not combined with the certificate, use this
104 # directive to point at the key file. Keep in mind that if
105 # you've both a RSA and a DSA private key you can configure
106 # both in parallel (to also allow the use of DSA ciphers, etc.)
107 SSLCertificateKeyFile /etc/httpd/conf.d/server.key.unsecure

[root@www2 ~]# vim /etc/php.ini #修改php配置文件,让httpd支持php
short_open_tag = On

# 重启lamp环境的服务,让修改的配置生效

设置httpd虚拟机主机,在相应的地方创建相应的目录及文件

1
2
3
4
5
6
7
8
9
10
11
12
13
14
15
16
17
18
19
20
21
22
23
24
25
26
27
28
29
30
31
32
33
34
35
36
37
38
39
40
41
42
43
44
45
46
47
48
49
50
51
52
53
54
55
56
57
58
59
60
61
62
63
#修改httpd配置文件,加载相应的模块
[root@www2 ~]# vim /etc/httpd/conf/httpd.conf
ServerName 192.168.100.20:80
LoadModule socache_dbm_module modules/mod_socache_dbm.so
LoadModule socache_shmcb_module modules/mod_socache_shmcb.so
LoadModule ssl_module modules/mod_ssl.so #开启ssl模块
LoadModule rewrite_module modules/mod_rewrite.so #开启重定向

[root@www2 ~]# vim /etc/httpd/conf.d/vhost.conf
<Directory "/var/www/html/www1"> #设置虚机目录权限
Options FollowSymLinks
#Options通常有Indexes选项,它的作用就是当该目录下没有 index.html 文件时,就显示目录结构,去掉 Indexes,Apache 就不会显示该目录的列表了。
AllowOverride All #是否允许覆盖,All是允许,可让.htaccess文件可以生效,None是不允许,由于要http强制跳转到https,所以需要开启这一选项
Require all granted #响应所有请求
</Directory>

<VirtualHost 192.168.100.20:8081>
#虚机ip及端口,这个端口是通过443转发访问的,httpd的主配置文件不需要添加Listen这个端口的配置
DocumentRoot "/var/www/html/www1" #虚机目录
ServerName 192.168.100.10 #虚机域名
ErrorLog "logs/www1-error_log"
CustomLog "logs/www1-access_log" common
</VirtualHost>

<Directory "/var/www/html/www2">
Options FollowSymLinks
AllowOverride All
Require all granted
</Directory>

<VirtualHost 192.168.100.20:8088>
DocumentRoot "/var/www/html/www2"
ServerName 192.168.100.10
ErrorLog "logs/www2-error_log"
CustomLog "logs/www2-access_log" common
</VirtualHost>


<Directory "/var/www/html/discuz/upload">
Options FollowSymLinks
AllowOverride All
Require all granted
</Directory>

<VirtualHost 192.168.100.20:8888>
DocumentRoot "/var/www/html/discuz/upload"
ServerName 192.168.100.10
ErrorLog "logs/discuz-error_log"
CustomLog "logs/discuz-access_log" common
</VirtualHost>

<Directory "/var/www/html/wordpress">
Options FollowSymLinks
AllowOverride All
Require all granted
</Directory>

<VirtualHost 192.168.100.20:8000>
DocumentRoot "/var/www/html/wordpress"
ServerName 192.168.100.10
ErrorLog "logs/wordpress-error_log"
CustomLog "logs/wordpress-access_log" common
</VirtualHost>

设置Apache的rewrite功能

1
2
3
4
5
6
[root@www2 ~]# vim /var/www/html/www1/.htaccess 
RewriteEngine on
RewriteCond %{SERVER_PORT} !^443$
RewriteRule ^(.*)?$ https://%{SERVER_NAME}%{REQUEST_URI} [L,R]

#在其他三个虚机的根目录下也穿件相同的.htaccess文件

在火狐浏览器上访问,导入ca证书,存入本地

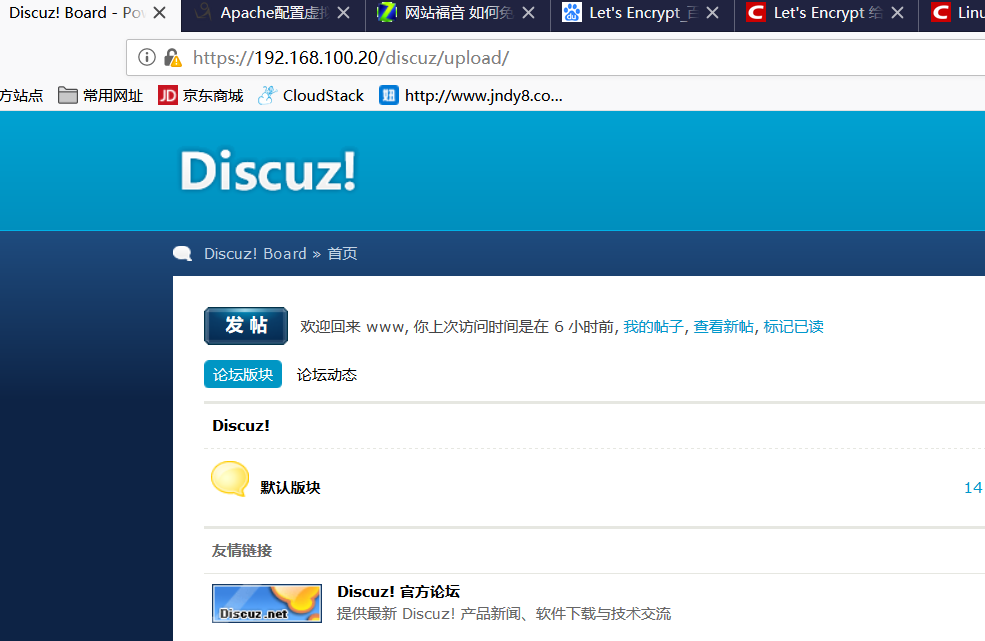
导入成功,就会http自动跳转到https,之后安装网页模板验证:

输入https://192.168.100.20/discuz/upload/install进行安装,安装成功后如下

1533637364111
1533637424137

坚持原创技术分享,您的支持将鼓励我继续创作!